

optimind.darkfunnels.ai/customize?panel=pixeles in the browser’s address bar.The people on your team who have access to the Ventas app can see it and
change it. How that access is given is in
Invite your team.A pixel without a website
The classic pixel is a piece of code that lives on a website and tells Meta every time someone buys. In a WhatsApp funnel there is no website and no browser, so that code doesn’t exist. What there is, is this: when a customer matches one of your rules (they reach a chapter of the sales playbook, or your agent records a sale), DarkFunnels sends Meta a notification (Meta calls it an “event”) through its Conversions API, the channel Meta offers for notifications that don’t come from a website. Along with the notification travel the data Meta needs to recognize the person: the phone number, the first name, the last name and the country, first converted into a fingerprint that cannot be reversed. Meta doesn’t receive that data in the clear. What does not travel is the conversation. What it’s good for:- Meta can optimize your campaigns for purchases and not only for conversations started, when it enables that objective on your account (further down we tell you what that depends on).
- You can normally build audiences of real buyers and lookalike audiences based on them.
- In Ads Manager you see purchases next to each ad, not just chats.
Before you start: the three things to know
What you need to get from Events Manager
Three pieces of information, all three from the same place: Meta’s Events Manager (atbusiness.facebook.com/events_manager). If your ad account
already has a pixel, skip to step 2.
To get there, from Ads Manager hover over the icon bar on the left: the menu
expands with the names and Events Manager is at the bottom.
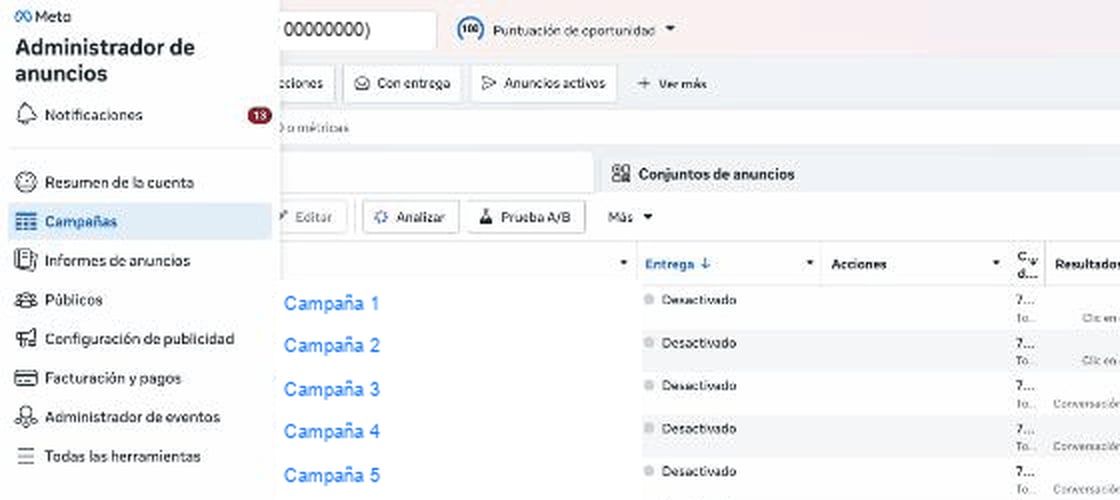
The Ads Manager left-hand menu, expanded. “Events Manager” is the second-to-last option.
Create the dataset, if you don't have one
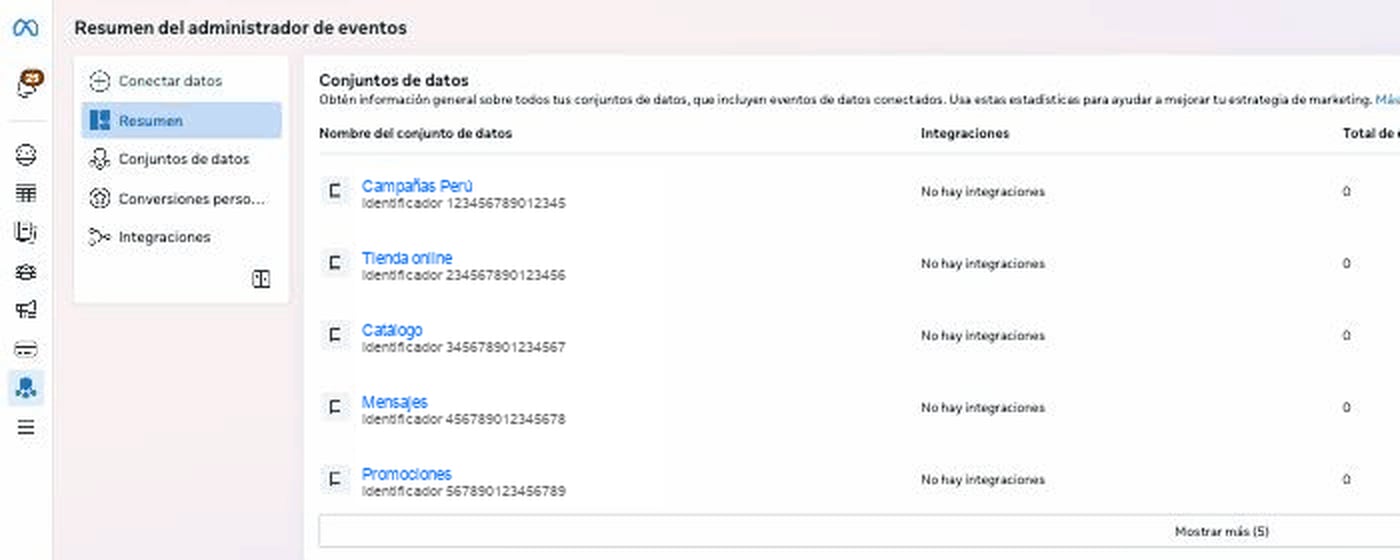
The Events Manager left-hand panel: “Connect data” is the first option.
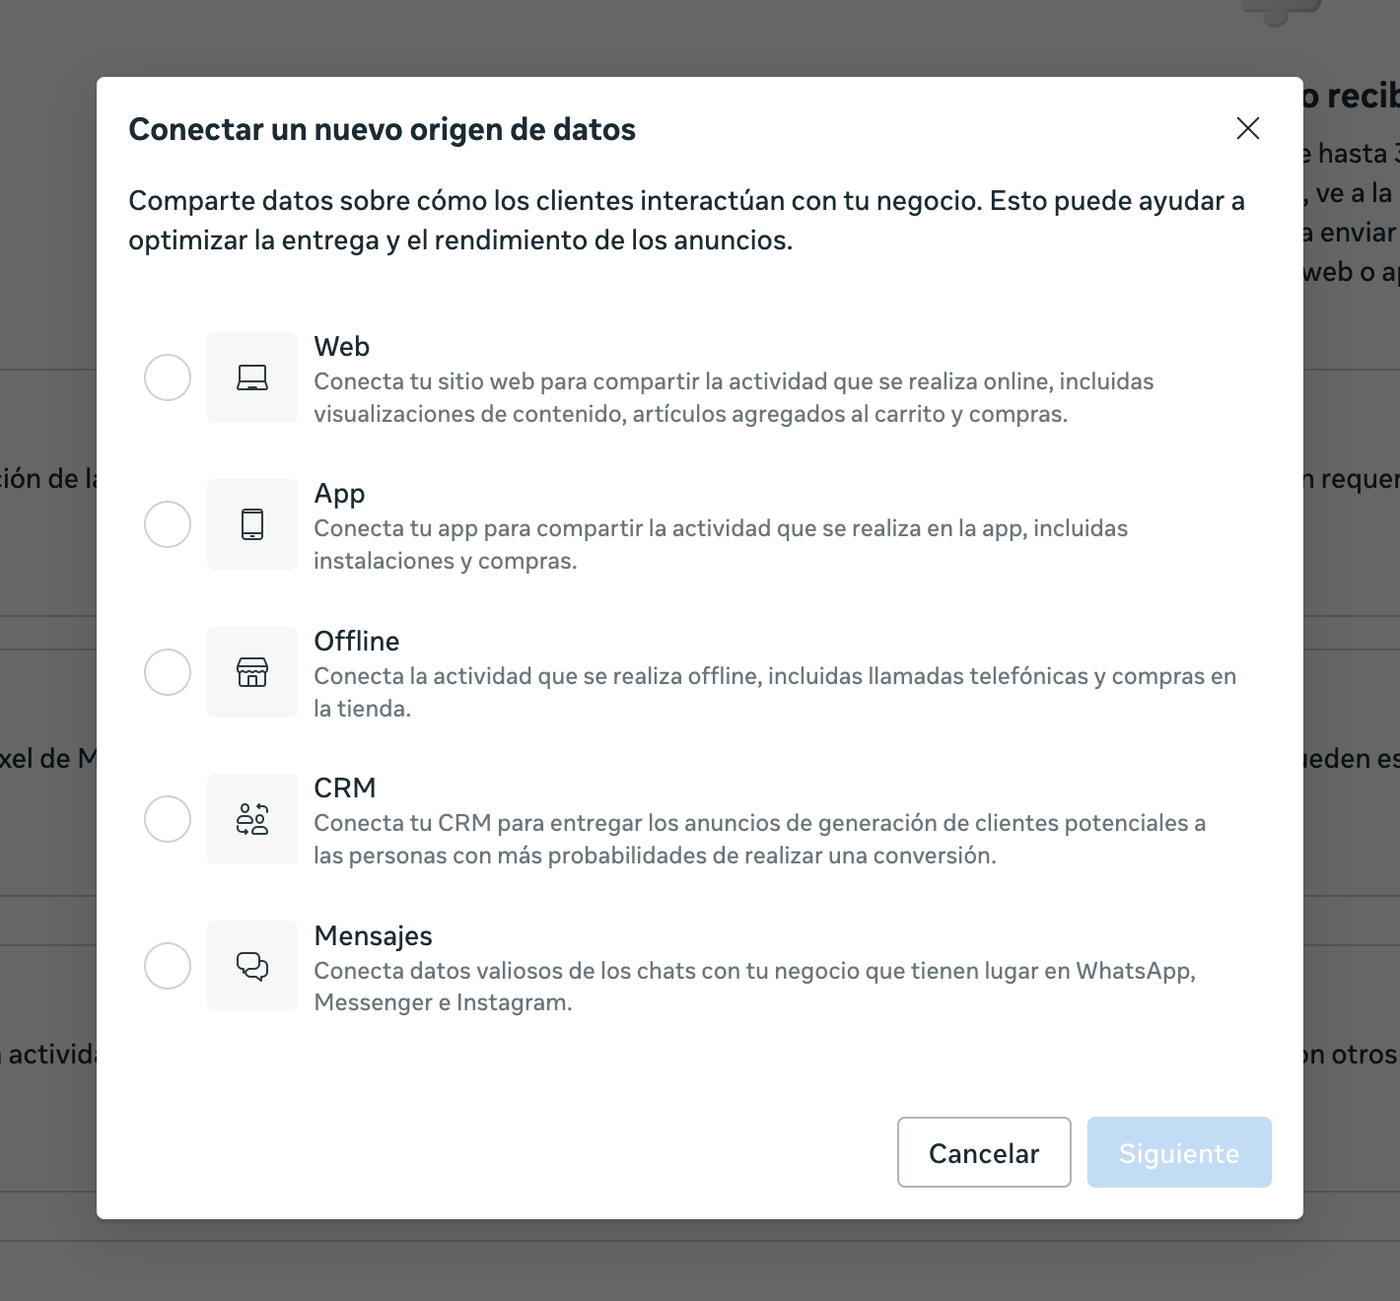
“Connect data” offers Web, App, Offline, CRM and Messaging. For your WhatsApp number, the option is Web.
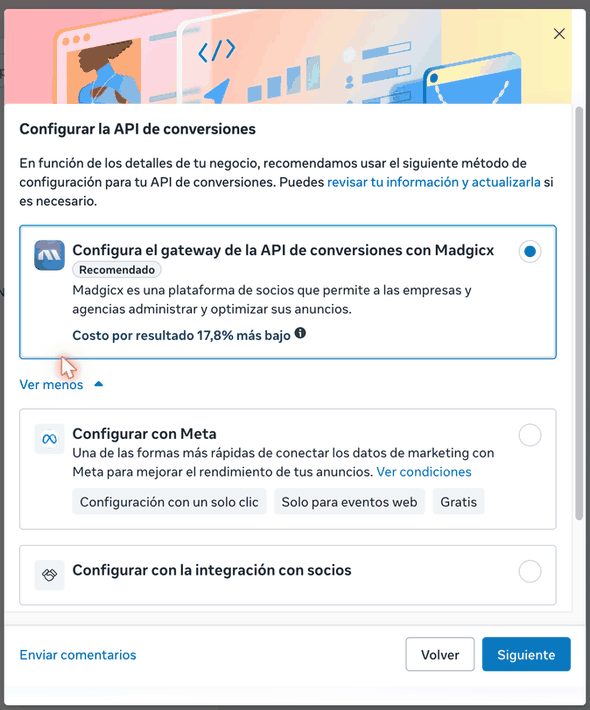
Meta first proposes a paid partner; expanding more options reveals Meta's own routes.
Copy the pixel ID
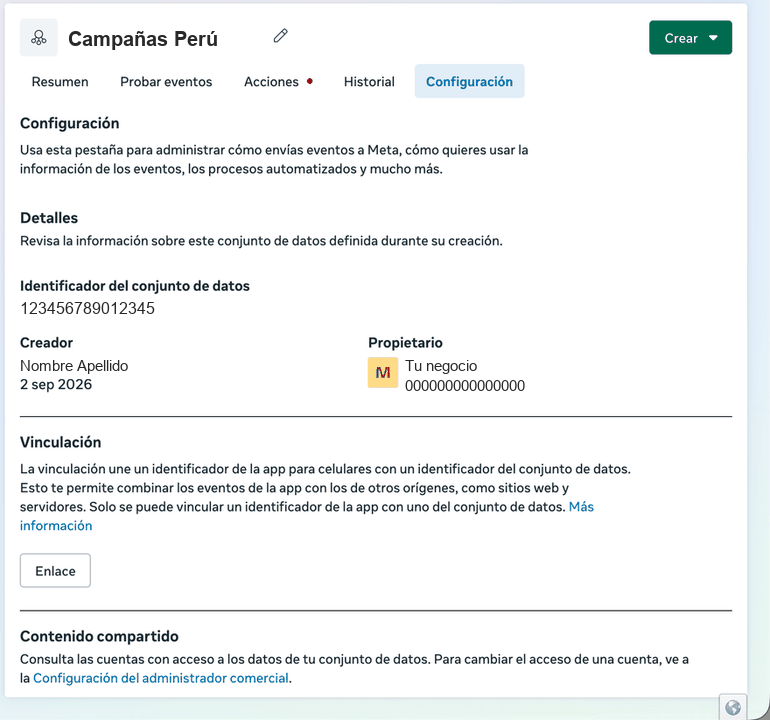
The Settings tab shows the ID that goes into DarkFunnels.
Generate the access token
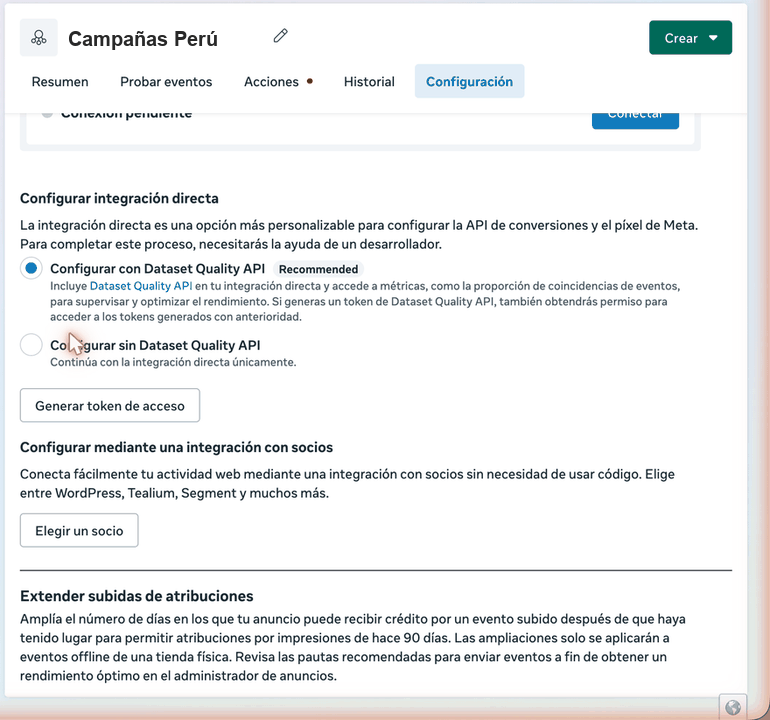
The “Generate access token” button. If it's greyed out, you're missing the permission on the business portfolio.
EAA, and Meta
warns that it does not store it: if you close the page without copying
it, you generate another one.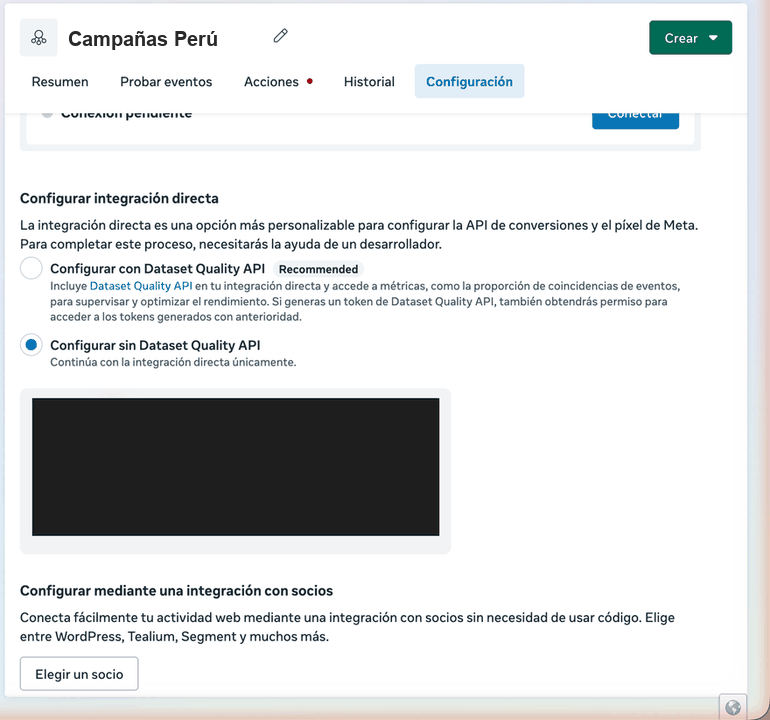
The token appears only once, with the notice to keep it somewhere safe (here, masked).
Copy the test code
TEST). That’s what
lets you check the connection instantly. You can save it in the pixel when
you create it, or paste it only when you test.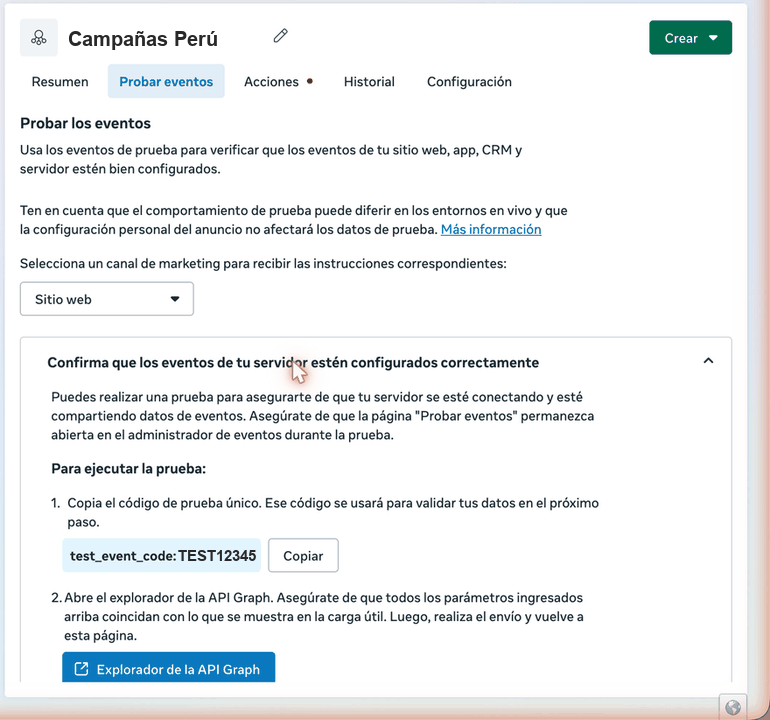
The test code lives inside the “Website” channel, in the server events block.
Connect it in DarkFunnels
Open «Píxeles» and click «Añadir píxel»
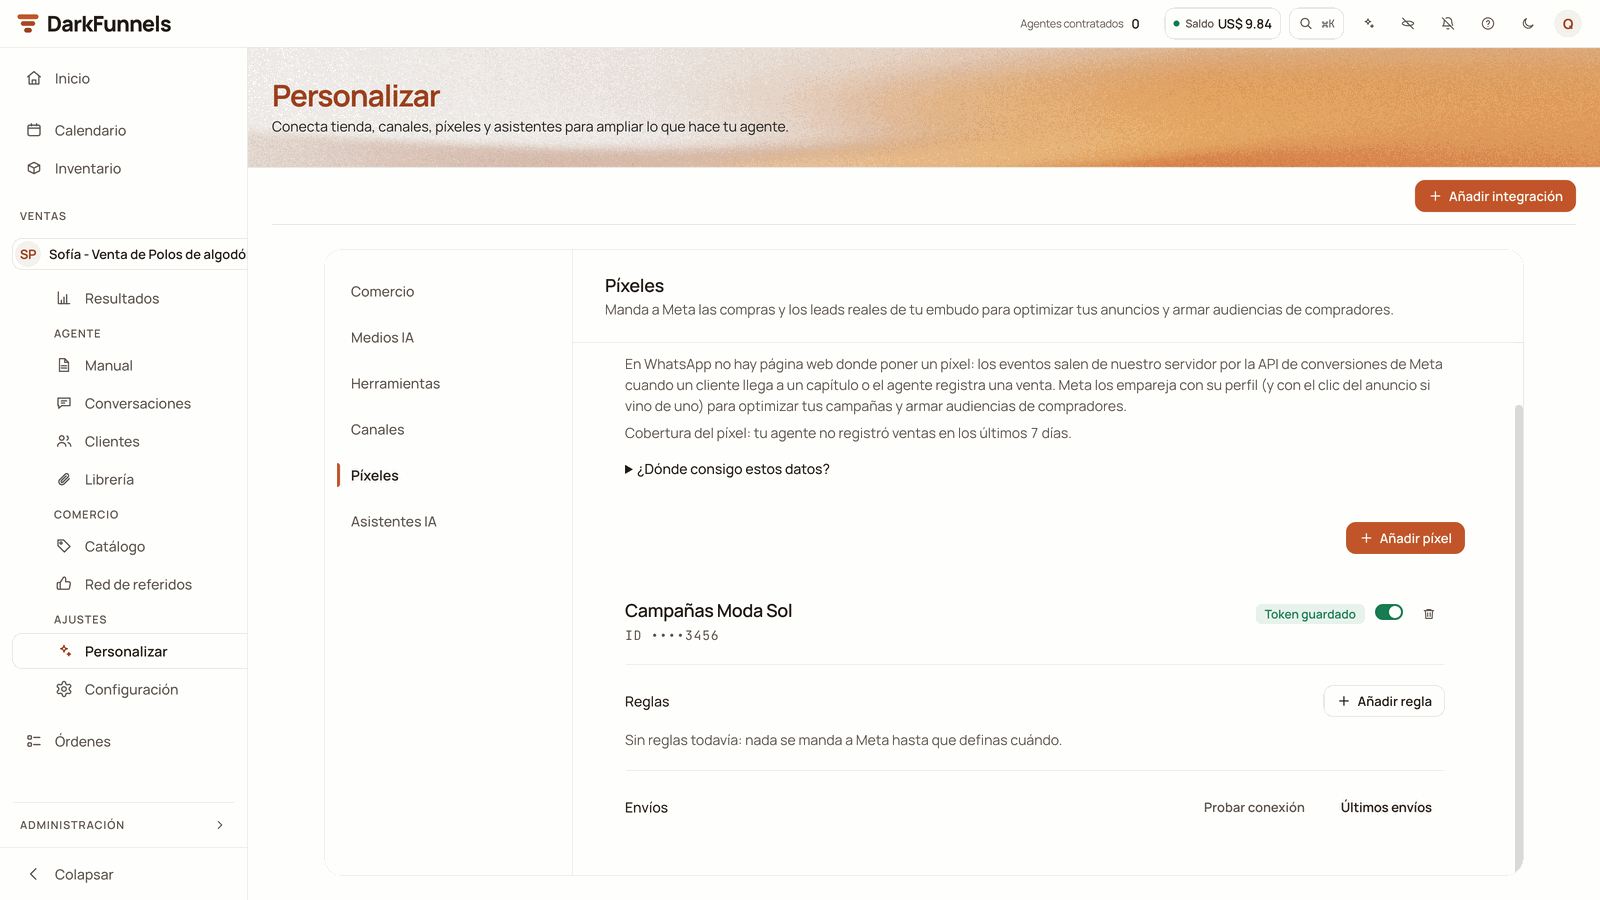
The Píxeles tab of Personalizar with a pixel already saved: «Campañas Moda Sol», with the Token guardado badge, its Reglas («Sin reglas todavía…», no rules yet) and its Envíos. Above it, the Añadir píxel button.
Fill in the form
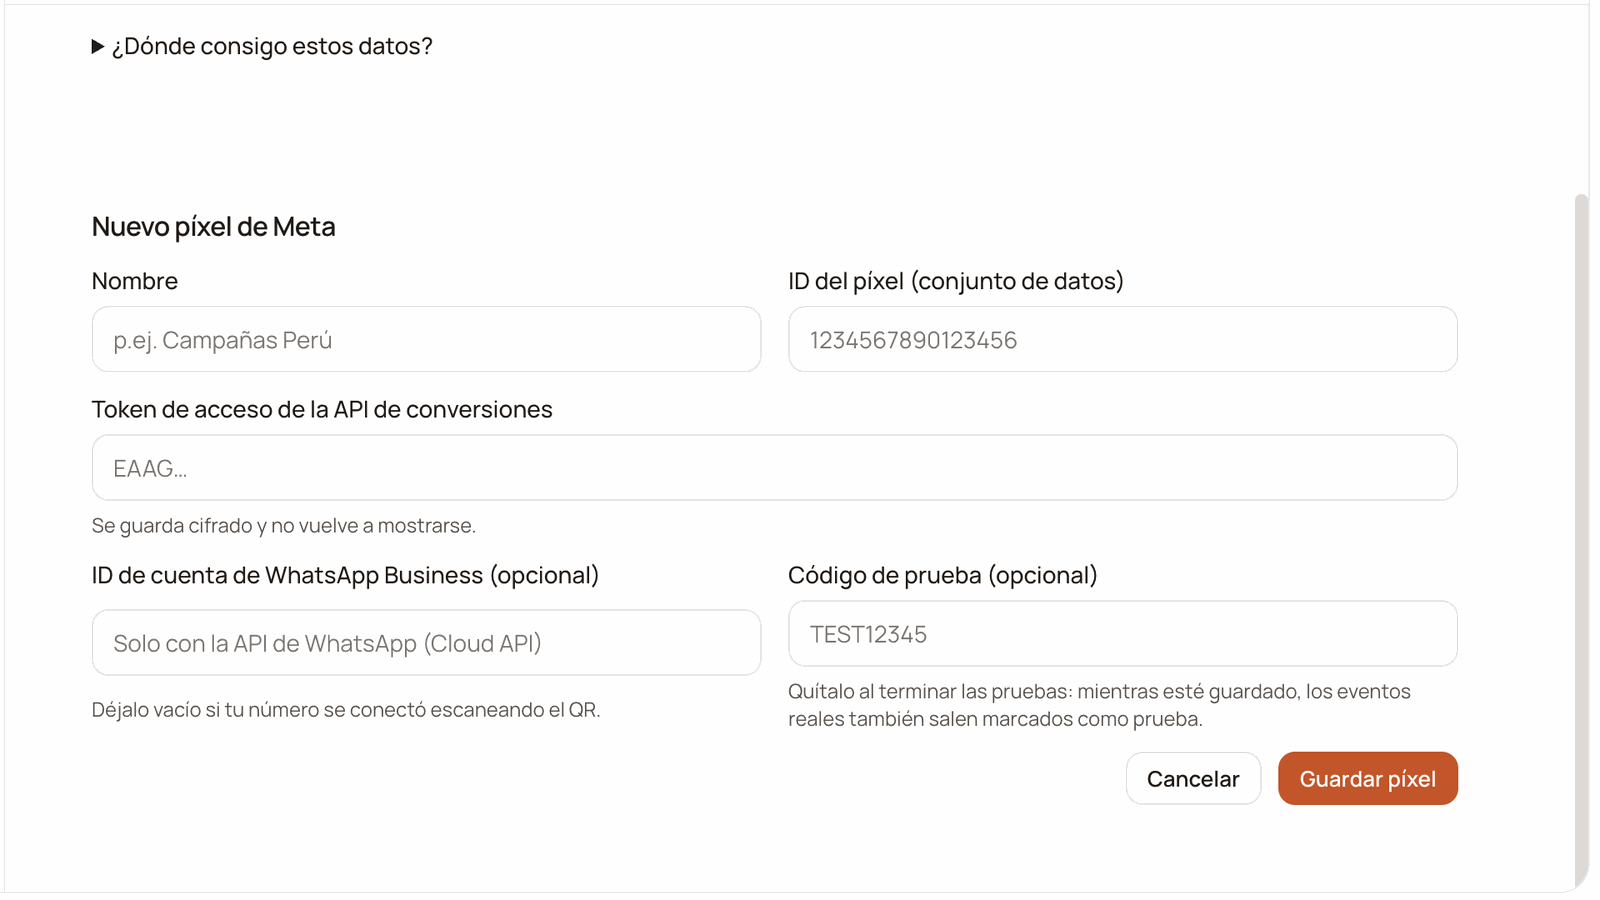
The «Nuevo píxel de Meta» (New Meta pixel) form. Under the token, the note: «Se guarda cifrado y no vuelve a mostrarse» (It is stored encrypted and is not shown again).
Save and test the connection
Remove the test code when you're done
The rules: when each event is sent
Each rule is a sentence: when a customer in this funnel does such a thing, Meta receives such an event. For almost every business two are enough: records a sale → Purchase and the chapter where the customer has already shown interest → Lead.Open «Nueva regla» (New rule)
Choose the funnel
Say what has to happen
Check the event and save
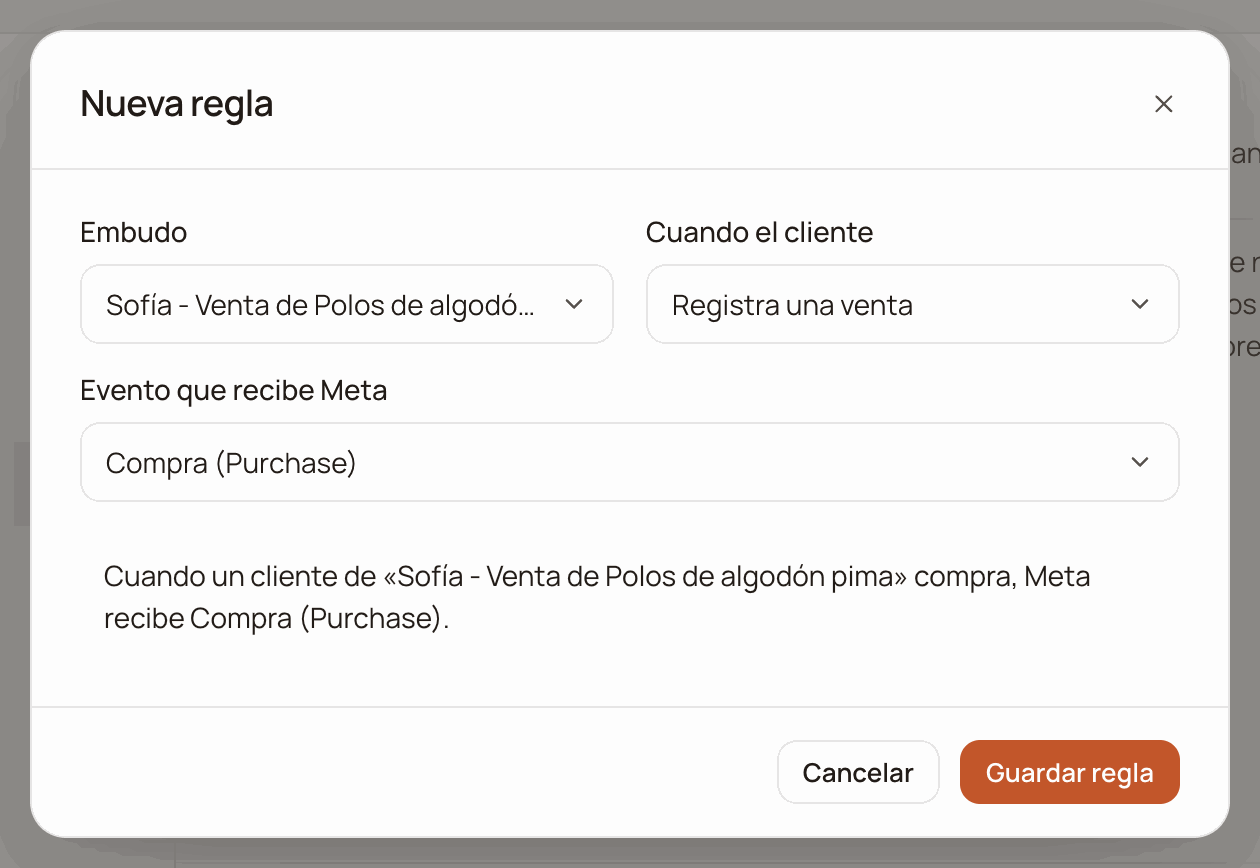
The «Nueva regla» (New rule) window: funnel, when and event, and below, the rule written out as a sentence before you save it.
- Chapter 1 can’t be chosen. Every contact is born there. Rules start at 2.
- The rule points at the chapter number, not at its name. If you reorder or delete chapters in the playbook, the rule keeps pointing at the same number: the dashboard reminds you of this when you create it, and it’s worth reviewing your rules after touching the playbook.
- A jump skips the ones in between. If your agent moves the customer from chapter 2 to 4, the rule for 3 doesn’t fire.
- Each arrival is sent once. The system records what it has already delivered and doesn’t repeat it. If the customer leaves the chapter and comes back in later, that’s another arrival and another notification goes out.
- If two rules on the same pixel match the same occurrence, the one you created first wins. If you have two pixels, each one sends its own notification.
- Moving the customer between chapters by hand also counts. If you drag a customer in the Capítulos (Chapters) view of Clientes or change their chapter from their profile, the rule fires just as if your agent had done it.
- A rule can’t be edited. To change it, remove it with the wastebasket icon on its row and create the new one.
- Each pixel allows up to 50 rules.
- Voiding a sale doesn’t subtract anything. The Conversions API has no refund notification and doesn’t accept subtracting a purchase: the Purchase already sent stays.
If you have an old «chapter → Compra» rule
It used to be possible to send Compra (Purchase) on reaching a chapter. Today the dashboard no longer allows it, because that purchase reaches Meta without the amount of the sale. If you type «Purchase» as a custom event in a chapter rule, the dashboard rejects it with «Compra necesita el monto de la venta…» (Purchase needs the sale amount…). If your pixel already had a rule like that, it keeps working (and sending purchases with no amount) until you delete it. You’ll see it with this notice in red underneath: Do it in that order. If you try to create the sale rule first (or any other one that sends Compra on recording a conversion in that same funnel), the dashboard won’t let you and warns you: «Este embudo ya manda Compra al llegar a un capítulo. Borra esa regla antes de crear Compra al registrar una venta, o Meta contará dos compras.» (This funnel already sends Purchase on reaching a chapter. Delete that rule before creating Purchase on recording a sale, or Meta will count two purchases.)What each send tells you
Two things on the tab tell you whether the pixel is working: the Cobertura del píxel (Pixel coverage) line, at the top, and Últimos envíos (Recent sends), on each pixel. You don’t have to ask anyone for a technical log.Pixel coverage
As soon as you have a pixel, the Manda tus ventas reales a Meta card adds a line like this one: Cobertura del píxel: 8 de 10 ventas de los últimos 7 días llegaron a Meta con su monto. (Pixel coverage: 8 of 10 sales from the last 7 days reached Meta with their amount.) It counts the sales your agent recorded in the last 7 days, across all your funnels, and how many of them reached Meta as a Purchase with their amount. If your agent didn’t sell that week, it tells you so: «tu agente no registró ventas en los últimos 7 días» (your agent didn’t record any sales in the last 7 days). If you see a dash (—), it couldn’t be calculated at that moment: open the tab again later. If the two numbers don’t match, the difference is usually in one of these cases:- The funnel of those sales has no sale rule. That funnel needs Registra una venta → Compra (Purchase) (or Cualquier conversión → Compra).
- The pixel was paused, or didn’t exist yet, when the sale was made. Those sales count in the total, but they weren’t sent and won’t be. The figure catches up on its own as the days go by.
- The send came out Omitido (Skipped) or Falló (Failed). The reason is in Últimos envíos.
- The sale rule sends another event (a custom one, for example): it reaches Meta, but this line only counts Purchases.
- The Purchase went out through an old chapter rule. That one carries no amount and doesn’t count.
- The sale was recorded without an amount or without a currency. It reaches Meta as a Purchase, but without an amount, and this line doesn’t count it.
Recent sends
Click Últimos envíos on the pixel’s card: you’ll see the last 20 notifications, one row each with its status, the event, where it came from (capítulo (chapter), conversión (conversion) or prueba (test)), the reason if something went wrong, and the time. To close it, Ocultar envíos (Hide sends).The ad click
When a customer messages you from a “Send WhatsApp message” ad, their message usually carries, hidden, the ad they came from and a click identifier. We store it alongside the contact without you having to do anything, and if the same customer comes back through another ad, the latest one is kept. You won’t see the click identifier on their profile: the send to Meta uses it. With that there are two ways of telling Meta what happened:- By phone number, the usual one. Meta receives the fingerprint of the number and matches it to the person; if that person saw or tapped your ads, it attributes it with its usual rules. The customer needs to write with a visible number and with a recognized country. If they arrive with a hidden number and didn’t come from an ad either, the notification is skipped. If they came from an ad, it goes out anyway, but without the WhatsApp Business account ID (the one in the next point) the click doesn’t travel: Meta only receives the fingerprints of the first name, the last name and the country, and an internal identifier, so it’s hard for Meta to match it.
- By the exact click, if, when creating the pixel, you also save the WhatsApp Business account ID. That ID belongs to numbers registered on the WhatsApp Business Platform (Meta’s official API), and it’s visible in Business settings → Accounts → WhatsApp accounts.
Lead travels with the name Meta uses for
messaging, and Meta understands a shorter list of events there: an appointment
or a custom event may not count.
The ad each customer came from is also used by the Anuncios (Ads) page,
which brings together what you spend on Meta with what happened in your chats.
If you don’t see it in your Ventas menu, it isn’t available on your account
yet. It’s covered in Connect your Meta ads.
In Ads Manager
For purchases to appear in the campaign results, the ad has to read from the same dataset. Edit the click-to-WhatsApp ad and scroll down to the Tracking block, below the welcome template: tick Website events and check that the dataset shown is the one you connected here. Click Publish.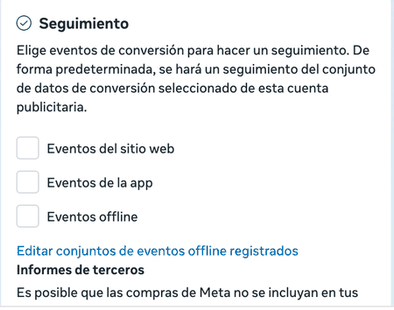
The ad's Tracking block, before ticking anything.
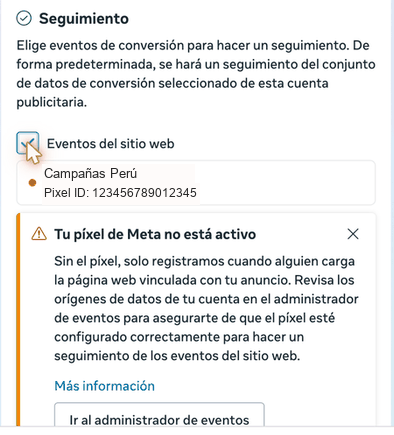
Ticking “Website events” reveals the dataset with its ID. The “Your Meta pixel is not active” notice is normal: there is no website loading the pixel; the notifications arrive from the server.
Common problems
“Generate access token” is greyed out
“Generate access token” is greyed out
In “Connect data” I chose “Messaging” and Meta says my Page doesn't meet the requirements
In “Connect data” I chose “Messaging” and Meta says my Page doesn't meet the requirements
«Probar conexión» (Test connection) says Meta received it, but I see nothing in Meta
«Probar conexión» (Test connection) says Meta received it, but I see nothing in Meta
«Meta rechazó el evento» (Meta rejected the event): “Invalid OAuth access token”
«Meta rechazó el evento» (Meta rejected the event): “Invalid OAuth access token”
A customer bought and there's no send at all
A customer bought and there's no send at all
- The pixel already existed and was active (toggle on) when the sale was recorded. What happened before you created it or while it was paused is not sent afterwards.
- There’s a sale rule for that funnel (each rule names its funnel).
- The sale was recorded by your agent in the conversation, not entered by you on the customer’s profile.
- It isn’t the sale the system records on its own when an order is charged.
It won't let me save the sale rule: «Este embudo ya manda Compra al llegar a un capítulo…»
It won't let me save the sale rule: «Este embudo ya manda Compra al llegar a un capítulo…»
Almost everything comes out «Omitido» (Skipped)
Almost everything comes out «Omitido» (Skipped)
I want to change the token, the name or a rule
I want to change the token, the name or a rule
I don't want to send anything yet
I don't want to send anything yet
What the pixel doesn’t do
So you don’t get a surprise:- It doesn’t send the sales you enter yourself on the customer’s profile (from Clientes or Conversaciones), even if the AI filled in the form for you. Nor the sale the system records on its own when an order your agent didn’t record in the chat is charged: for Meta, what counts is what the agent recorded.
- It doesn’t subtract anything when a sale is voided.
- It doesn’t send notifications more than 7 days old, nor while the pixel is paused or has no rules.
- It doesn’t pass Meta the content of the conversations. What does travel: the fingerprints of the phone number, the first name and the last name, the country and an internal contact identifier; on conversions, the amount, the currency, the product code and the order identifier, when there are any; and, if you use click attribution, the click identifier and the one for your WhatsApp Business account, which are Meta’s data, not yours.
- It doesn’t move money and doesn’t touch your campaigns or your ads: it only sends notifications to Meta.